

Have you ever tried to import thousands and thousands of unique options/SKUs into BigCommerce? If you are reading this, there is a good chance it was a messy process and you are looking for a solution.
Well, we have one!
Note: If you are having BigCommerce lead the migration just remember their general approach is to import all your products and let the BigCommerce system create all the separate Options and Option Sets for each one. That's generally ok if you have 10 products, but it doesn't scale well if you have thousands and thousands of options and rules.Why not?
Well, the big issue is if you want to make a change across the board to a bunch of your products (e.g. add a color, change size, assign a price rule, etc.) it is now a Herculean task and will take a huge amount of time if you try to do this from the BigCommerce admin.
Thanks to Dave at Nerdkungfu.com we have a solution. We used his massive BigCommerce store as the case study so our teams could create a step-by-step guide on how to safely and quickly manipulate thousands of Bigcommerce options.
This is your complete guide for unifying option sets in BigCommerce. It's a lot to digest but simply take it step-by-step and you'll be able to successfully update/import thousands of your complex options sets and rules. Let's get started.
1. Create The Option Set
For this we going to use a _sizing_ option set. If you are unsure what that is there is a BigCommerce support article describing this. You should also assign whatever rules you feel are necessary. Again there is a support article for mastering that: https://support.bigcommerce.com/articles/Public/Product-Options-Rules/?q=Rules&l=en_US&fs=Search&pn=1. Most store owners will already be acutely aware of these two small concepts.
The option set we will be using for this guide will be 1 Juniors Sizing
Quick Tip: if you have lots of options or option sets, prefix them with a number. Give the ones you work with a lot a lower number so they will always be at the top of your list. (Fig 1).
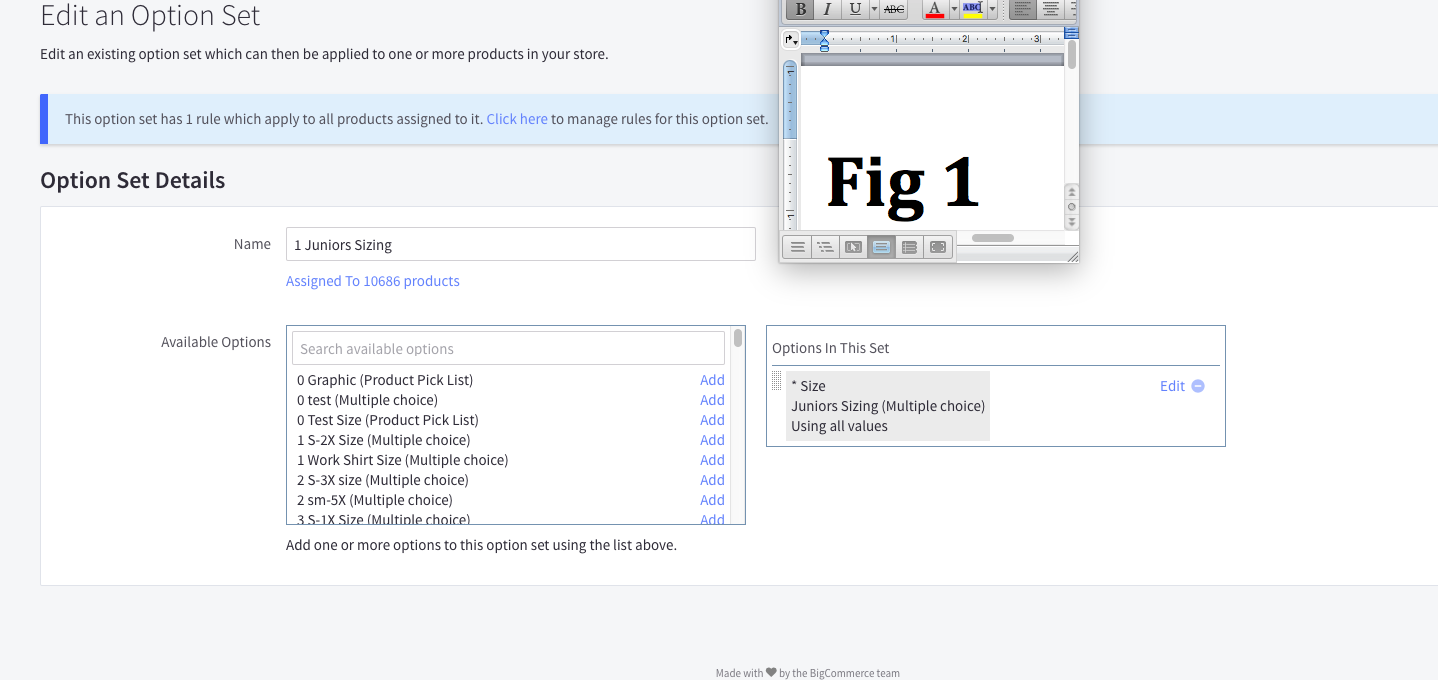
The option set 1 Juniors Sizing we are using has five sizes and one pricing rule (adding $2.00 to the price) for size 2Xl. This adds a little complexity for this exercise.

2. Select Products to Fix
In the BigCommerce admin go in and start selecting all the products you need to fix. They should all have similar options both in type and quantity in spite of having separate option sets. For this I have selected five Archie Comic t shirts. However you can effectively do this with any number of products you like. (Fig 3)

There are a bunch of different search tricks that can help you with this and it is important to know the difference between searching and filtering on the dashboard. Here is a support article on that: https://support.bigcommerce.com/articles/Public/Searching-Products/?q=searching+products&l=en_US&fs=Search&pn=1
3. Edit The SKU
Click the very first product and go to the tab called Inventory and make sure Track Inventory by Options is selected. Click the Options and SKUs. If you track inventory for this product, take note of the current inventory so you don’t lose track of it. This is the only time you will need to do this.
In Options and SKUs you will see three tabs on the left. The first one is marked options. Select your the option you are going to use. At the start of the article we mentioned it would be Juniors Sizing. At this point you can thank yourself for numbering your option sets. See how it’s right there at the top of the list? (Fig 4).

Now doing this will remove your current SKUs for this product so we need to re-create them. Click on the side tab marked SKUs. Your product should look like Fig 5. Click on the Generate SKUs button.

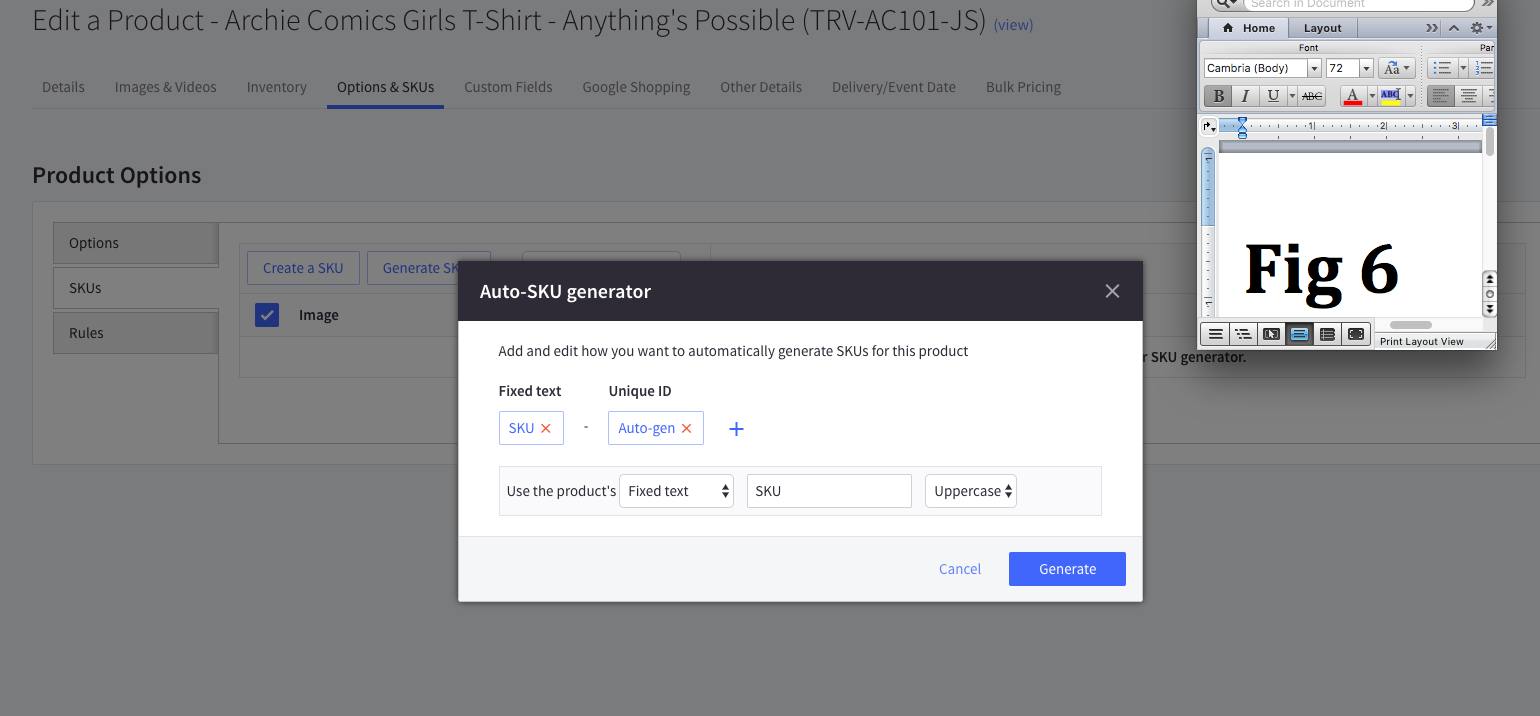
Go ahead with the auto generate. (Fig 6)
The system will generate generic codes (Fig 7).

Next to each product click on the three dots under Action and select Edit. Here you can change the SKU to match the product SKU with a size designator (Fig 8). Use naming conventions that makes sense for your business. In this example AC is Archie Comics.

Be sure to check to make sure you are calling it according the size the system designated (Fig 9).

As long as you are here you can put the inventory back in at it’s correct level for this SKU. Rinse and repeat until all SKUs are properly named. (Fig 10)

4. Create the Seed Product
Take note of the parent SKU of this product. TRV-AC101-JS. This is a very important step. This product will be the SEED for all future tasks in this guide.
5. Export Products
Go back to the product listing in the BigCommerce admin and export these products including your Seed. Use the Bulk Edit template. Here is how to do it: https://support.bigcommerce.com/articles/Public/Exporting-Products/?q=exporting+&l=en_US&fs=Search&pn=1. Save a copy of this export as a backup in case something goes wrong.
6. Clean Your Excel
After the export is complete make sure your Seed product and its SKU are at the top of the list. If they aren’t, cut and insert them into the top of your CSV file. If you aren’t sure, here are instructions on how to do it: https://www.safaribooksonline.com/library/view/excel-2010-the/9781449382360/ch03s15.html
UPC WARNING: If you use UPCs and try to re-import, your UPCs will be mangled. Excel insists on converting the numbers to Scientific Notation. Before you do anything else go to column BB and highlight it (Fig 11).


Right Click>Format Cells>Number lower decimal places to 0. This will fix it. If you use your UPC as a GTIN to the same thing in Column BF (Fig 13).

This is a very good habit to get into. We recommend double checking before each upload or simply eliminate these columns by deleting them or creating a custom upload template.
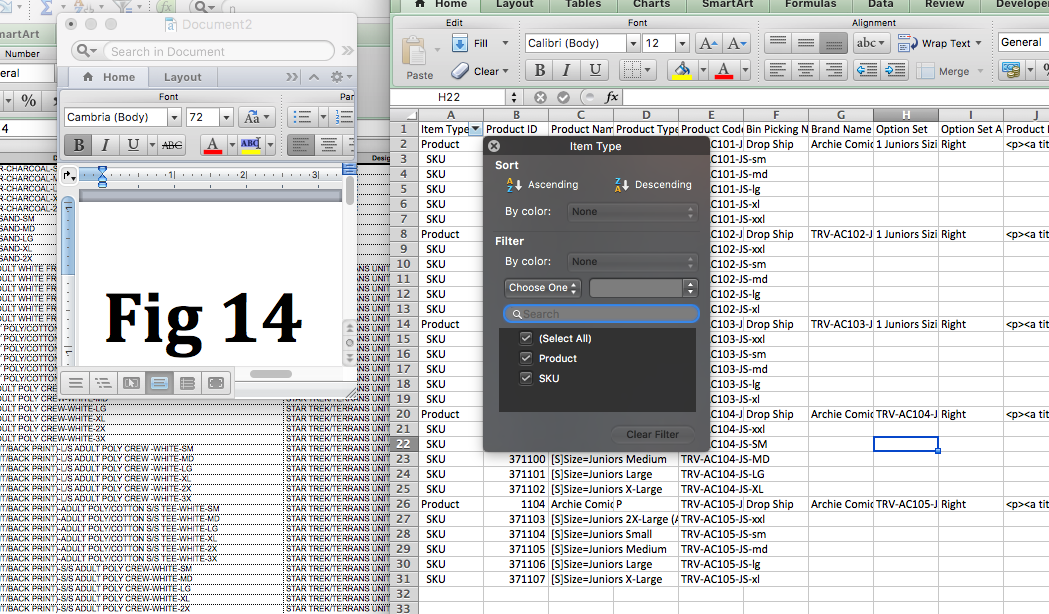
Now go back to the far left of your spreadsheet. Highlight column A and Data>Filter. A little triangle will appear in cell A1. Click the triangle and at the bottom of the filter toggle OFF Products (Fig 14).
All the lines with products will be hidden (Fig 15). Remember your Seed product SKU. It should be the top set of SKUs. In our example remember that it is TRV-AC101-JS so the first 5 items in Fig. 15 are correct.

Remember your Seed product SKU. It should be the top set of SKUs. In our example remember that it is TRV-AC101-JS so the first 5 items in Fig. 15 are correct.

Delete all the product names (Column C) under the Seed product by highlighting the cells and hitting the delete key. Do not use the right click>Delete or it will eliminate the cells. (Fig 17).

Next, do the same thing for Columns B (Product ID) and Column E (Product Code). (See Fig. 18).

What we’ve done is eliminate the old SKUs with all the weird option sets so we can create new ones while retaining the UPCs and current inventory.
Hit the triangle again and hit Clear Filter. Then highlight Column A and Right Click>Insert to add a new column (Fig 19).

Highlight column F (Product Code) and copy it. Paste the new column A (Fig 20).

Highlight Column A (Product Code/SKU) and hit F5. The Go To Window will appear. Hit Special (Fig 21) and Select Blanks and hit OK.

Now all the blank cells are selected and you are in the first one. DO NOT HIT ANYTHING ELSE or you will lose it. (Fig 22).

In that first cell type the equal sign = and click the cell above it. Hold down the Ctrl key and hit enter. All the cells now look full of the SKU (Fig 23).

I say “Looks like” because the cells don’t actually have the date it shows but rather the formula used to get it. Highlight Column A copy and right click. Select Paste Special and Choose Values. Hit OK. The cells now have the correct data.

Now we do the exact same trick to fill in the Column D (Product name). Highlight the column, F5>Special>Blanks>OK. In that first cell type = and choose the name of the first SKU in your Seed product. Ctrl Enter and like magic the correct Product Names appear. Isn’t Excel neat? Highlight the column, copy it, Right Click>Special>Values> Ok just like above to give us the correct values.
Go back to your triangle in Column B (Item Type) and this time toggle off SKU. Now only products should appear. Go to column I (Option Set) and select the Option Set cell for your Seed product. Copy it (Fig 25).

Highlight all the option sets under it and paste. The name of your unified option set is now set for each product. Go back to your triangle and hit clear filter. Make sure the option set name is correctly listed in each product. Data>Filter in order to get rid of your filter (the little triangle). Highlight column D (Product Name) and hit Data>Filter to create a filter (triangle) in that column. Copy the first Product Name for the SKU. Hit the little triangle and paste. (Fig 26). All the other SKUs should disappear just leaving your first one (In this case Junior Small).

In column F (Product Code) go to the first empty cell under the Seed cell and type the following : =A9&”-sm” (Fig 27)
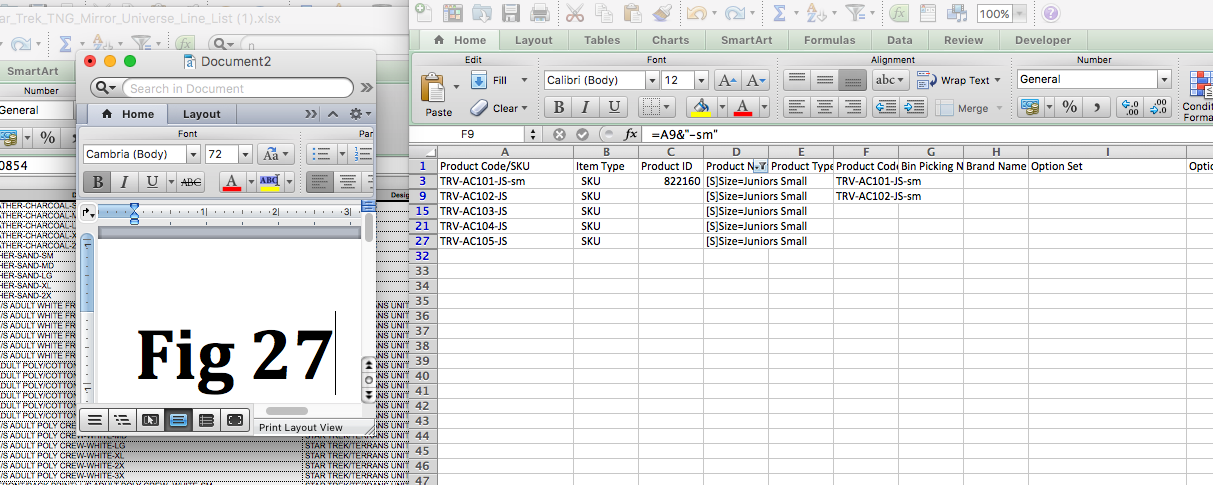
In other words in that cell type the equal sign(=), click on the cell with the parent Product Code/SKU on the far left cell, the ampersand (&), quote (“), and whatever your SKU designator is, and the quote (“). In this example we are using “-sm” to mark the SKU as size small in the code but it could be whatever you want for any option. Copy that cell with the equation and paste it into all the cells under it (Fig 28).

Triangle>Clear Filter then rinse and repeat with each SKU type in turn. The final results should look like Fig 29 after you clear the filter for the last time.

Clear filter then copy column F and Right Click>Paste Special>Values as above to replace the formulas with actual values as above. Data>Filter to get rid of the filter. Then (IMPORTANT) highlight column A (duplicate Product Code/SKU) RIGHT CLICK (not delete key) and delete.
You are good to go. Save this document as a .csv and follow the instructions for product reimport. If you are not sure about your work, we would recommend just taking the first few and running a test import to make sure it works but otherwise you are set.
Need help with BigCommerce? If this is too daunting of a task, we'd be happy to work with you. Let’s chat.